
SQL Server 2012/2014 AlwaysOn Availability Groups:
- Article Summary
- Part 1 – AlwaysOn Introduction
- Part 2 – AlwaysOn Design
- Part 3 – Install and Configure Windows Server 2012 R2 in Core mode
- Part 4 – WSFC Cluster Creation
- Part 5 – Install SQL Core on Windows Core Server
- Part 6 – AlwaysOn Availability Groups Creation
- Part 7 – AlwaysOn Availability Groups Creation (Advanced, with dedicated Replication Network)
- Part 8 – Methods to add Database on Availability Groups (SCOM Example)
- Part 9 – AlwaysOn Availability Groups – PowerShell Monitoring
- ANNEX (Part 6/7) – Manage SQL Endpoint

This part covers the installation of SQL Server on Core node (with the creation of a SQL Configuration INI file).
Requirements
MSA AD Account
In Part 3, I created this group/account:
- – lab1\SQLAlwaysOnAdmins
- – lab1\sqlaoinstall
Now, I need to create the MSA accounts for each node.
(Note: You can find PowerShell scripts used for this part here)
MSA Account for Instance 1:
From a DC, start PowerShell (run as Administrator) with a Domain Admin account.
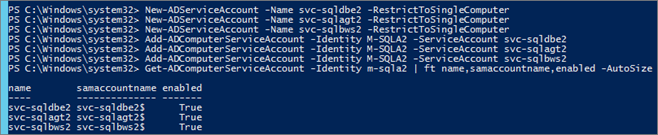
Creates new managed service accounts and restrict its use to a single computer:
New-ADServiceAccount -Name svc-sqldbe1 -RestrictToSingleComputer -Description "SQL MSA"
New-ADServiceAccount -Name svc-sqlagt1 -RestrictToSingleComputer -Description "SQL MSA"
New-ADServiceAccount -Name svc-sqlbws1 -RestrictToSingleComputer -Description "SQL MSA"
Associate MSA accounts with the target SQL Server:
Add-ADComputerServiceAccount -Identity M-SQLA1 -ServiceAccount svc-sqldbe1
Add-ADComputerServiceAccount -Identity M-SQLA1 -ServiceAccount svc-sqlagt1
Add-ADComputerServiceAccount -Identity M-SQLA1 -ServiceAccount svc-sqlbws1

View Service Account associate to a Server:
Get-ADComputerServiceAccount -Identity m-sqla1 | ft name,samaccountname,enabled -AutoSize

You can see MSA accounts from “Active Directory Users and Computers” console:

Go to the SQL Server (M-SQLA1) (you must be connected with a Domain Admin account):
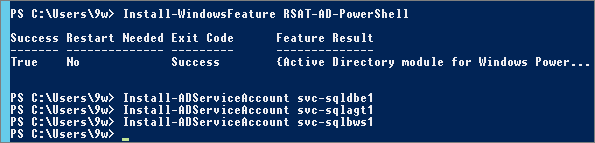
- – Install the AD PowerShell Module
- – Install MSA accounts previously created
Install-WindowsFeature RSAT-AD-PowerShellInstall-ADServiceAccount svc-sqldbe1
Install-ADServiceAccount svc-sqlagt1
Install-ADServiceAccount svc-sqlbws1
Repeat the Operation for all nodes:
- M-SQLA2, M-SQLA3, M-SQLA4

TechNet Resources:
- – New-ADServiceAccount
- https://technet.microsoft.com/en-us/library/hh852236.aspx
- – Add-ADComputerServiceAccount
- https://technet.microsoft.com/en-us/library/hh852266.aspx
- – Install-ADServiceAccount
- https://technet.microsoft.com/en-us/library/hh852196.aspx
Security Note for Service Accounts
If you are using a standard AD Account (not a MSA), you have to Assign “Deny logon locally” right to SQL service accounts (through secpol.msc or GPO) on each node.

And from AD, you have to assign “Deny permissions to log on to Remote Desktop Session Host server’:
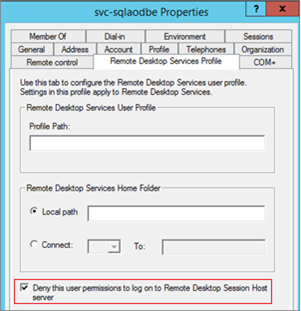
With MSA, these steps are not necessary.
Install First SQL Server
The installation of SQL can be fully automated via an INI answer file. To prepare the INI file, I will install the first server via the wizard.
Note: Normally, to create the INI file I use the SQL Installation Wizard and I cancel it just before the installation.
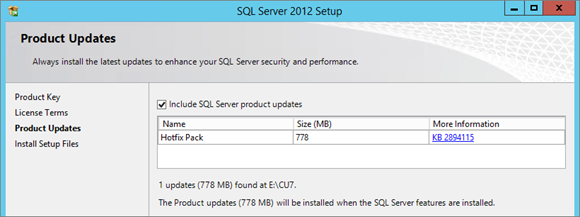
First download the last Cumulative Update for SQL and copy it on the server. (To check the last CU available: https://support.microsoft.com/kb/2772858/en-us)
From first node (M-SQLA1), connect with sqlaoadm account; launch the SQL Setup (with the CU included):
| CMD | |
| Setup.exe /Action=Install /UpdateEnabled=TRUE /UpdateSource=“E:\CU” | |
Note: By default Setup will search update on Microsoft Windows Update (require Internet access), this is equivalent to “/UpdateSource=MU” parameter.

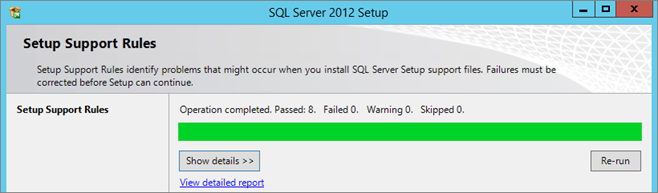
Update retrieve from local path:
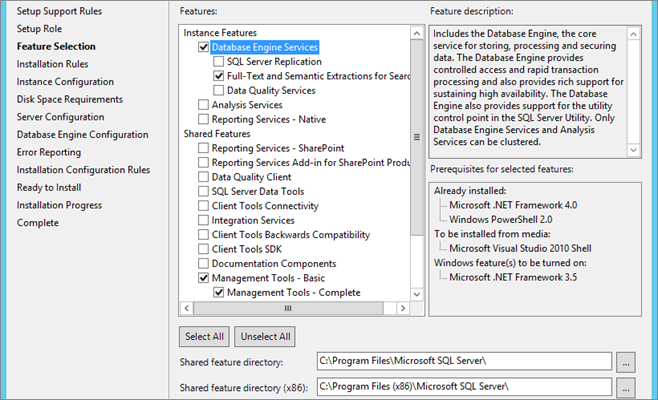
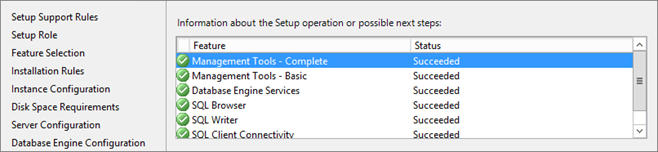
Select Features:
- Database Engine Services
- Full-Text Search (needed for SCOM Databases)
- Management Tools – Complete
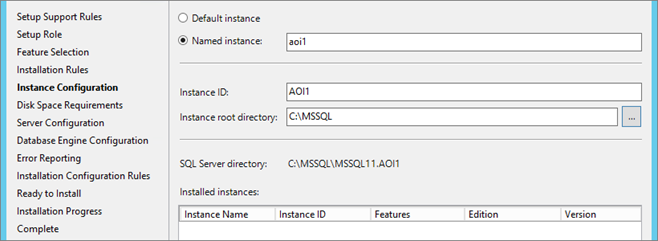
Select “Named instance” and enter name and path:
Disk space requirements:

Configure Service account (MSA, add a “$” at the end of account name) and Startup Type:
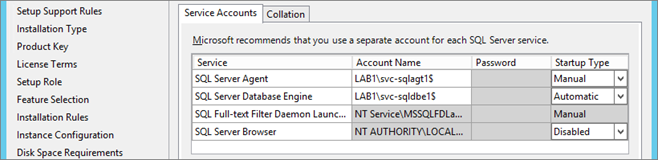
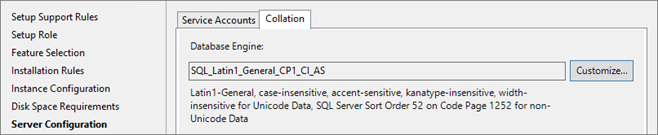
Set Collation to (this is the collation required for System Center Product): SQL_Latin1_General_CP1_CI_AS
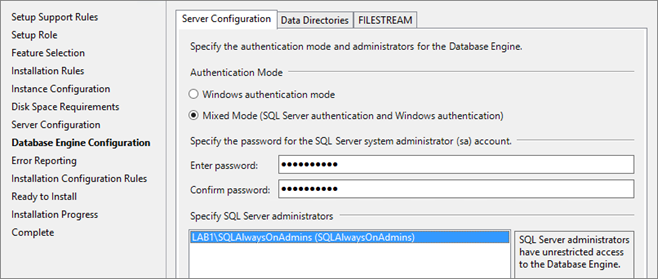
I use “Mixed Mode” to keep the sa account as “lifeboat account”, but for security I rename the sa account later.
Add the “SQLAlwaysOnAdmins” group:
Set paths:

Start installation :
Automate Installation
Prepare SQL Setup INI File
Retrieve ConfigurationFile.ini from previous installation (M-SQLA1), path:
C:\Program Files\Microsoft SQL Server\110\Setup Bootstrap\Log\20xxxxxx_110110
Edit the file and do the following modifications:
Installation Options:
Remove:
- – UIMODE=”Normal”
- – QUIET=”False”
Modify:
- – QUIETSIMPLE=”True” (Original value: False)
(Setup will display progress only, without any user interaction)
Add:
- – IAcceptSQLServerLicenseTerms=”True”
(Accept the License agreement to continue with Installation)
Feature Options:
Modify:
- – FEATURES=SQLENGINE,FULLTEXT
Removed feature:
- – SSMS: Management Tools – Basic
- – ADV_SSMS: Management Tools – Complete
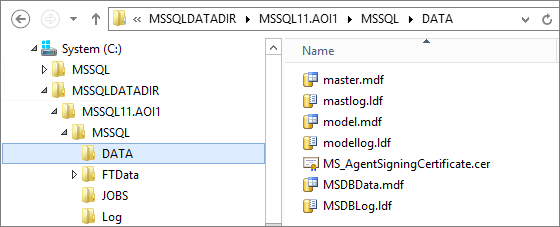
Path Options:
Add:
- – INSTALLSQLDATADIR=”C:\MSSQL”
(Specifies the data directory for SQL Server data files)
Default values:
- * For WOW mode on 64-bit:%Program Files(x86)%\Microsoft SQL Server\
- * For all other installations:%Program Files%\Microsoft SQL Server\
- * For WOW mode on 64-bit:%Program Files(x86)%\Microsoft SQL Server\
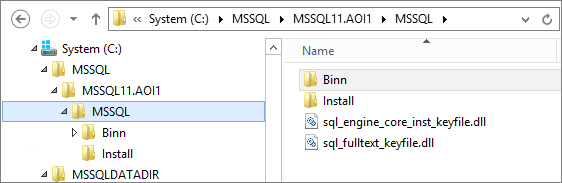
Note – Parameters Path
Do not confuse these two parameters: “INSTALLSQLDATADIR” and “INSTANCEDIR”.
Example Result:
; Specify the installation directory. (Contains binary files)
INSTANCEDIR=”C:\MSSQL”
; Specify the Data directory for SQL Server data files (Contains System Databases, Logs, JOBS, FTData)
INSTALLSQLDATADIR=”C:\MSSQLDATADIR”
Note – About COMMFABRIC Parameters
When you retrieve an INI file generates by SQL Wizard, there are these parameters (not listed in the TechNet article):
; CM brick TCP communication port
COMMFABRICPORT=”0″
; How matrix will use private networks
COMMFABRICNETWORKLEVEL=”0″
; How inter brick communication will be protected
COMMFABRICENCRYPTION=”0″
; TCP port used by the CM brick
MATRIXCMBRICKCOMMPORT=”0″
These parameters are for Microsoft internal tests and can be removed:

Now the file is ready to be used in silent installation (and in addition on a core server, without Management Tools features)
INI File (M-SQLA1\AOI1):
|
INI |
|
| ;SQL Server 2012 Configuration File [OPTIONS] ; INSTALL OPTIONS———————————————————————- ACTION=“Install” ENU=“True” QUIETSIMPLE=“True” ;Specifies that the detailed Setup log should be piped to the console. INDICATEPROGRESS=“FALSE” HELP=“False” X86=“False” IACCEPTSQLSERVERLICENSETERMS=“True” SQMREPORTING=“False” ERRORREPORTING=“False” ENABLERANU=“False” FILESTREAMLEVEL=“0” ; Updates: UPDATEENABLED=“True” UPDATESOURCE=“L:\SQLCU” ; FEATURE OPTIONS———————————————————————————- FEATURES=SQLENGINE,FULLTEXT ;To Add Management Tools (not compatible on core installation): ;FEATURES=SQLENGINE,FULLTEXT,SSMS,ADV_SSMS ; SSMS : SQL Server Management Tools – Basic ; ADV_SSMS: SQL Server Management Tools – Complete ;Path —————————————————————————————– INSTALLSQLDATADIR=“C:\MSSQL” INSTANCEDIR=“C:\MSSQL” INSTALLSHAREDDIR=“C:\Program Files\Microsoft SQL Server” INSTALLSHAREDWOWDIR=“C:\Program Files (x86)\Microsoft SQL Server” ; Instance —————————————————————————— INSTANCENAME=“AOI1” INSTANCEID=“AOI1” SQLCOLLATION=“SQL_Latin1_General_CP1_CI_AS” ; Service – SQL Server SQLSVCACCOUNT=“lab1\svc-sqldbe1$” SQLSVCSTARTUPTYPE=“Automatic” ; Service – Agent AGTSVCACCOUNT=“lab1\svc-sqlagt1$” AGTSVCSTARTUPTYPE=“Automatic” ; Service – Browser Service BROWSERSVCSTARTUPTYPE=“Disabled” ; Service – Full-Text Search FTSVCACCOUNT=“NT Service\MSSQLFDLauncher$AOI1” ; Default Path – Database Engine user databases SQLUSERDBDIR=“G:\MSSQL\AOREPLICA\Data” SQLUSERDBLOGDIR=“L:\MSSQL\AOREPLICA \Log” ; Default Path – Database Engine backup files SQLBACKUPDIR=“G:\MSSQL\MSSQL11.AOI1\MSSQL\Backup” ; Path – Database Engine TempDB files. SQLTEMPDBDIR=“G:\MSSQL\MSSQL11.AOI1\MSSQL\TempDB\Data” SQLTEMPDBLOGDIR=“L:\MSSQL\MSSQL11.AOI1\MSSQL\TempDB\Log” ; Protocol – TCP/IP (0=disable – 1=enable) TCPENABLED=“1” ; Protocol – Named Pipes (0=disable – 1=enable) NPENABLED=“0” ; Security —————————————————————————— ; SQL Server system administrators. SQLSYSADMINACCOUNTS=“LAB1\SQLAlwaysOnAdmins” ; Authentication Mode (SQL=Mixed Mode) SECURITYMODE=“SQL” ; Provision current user as a system administrator ADDCURRENTUSERASSQLADMIN=“False” |
|
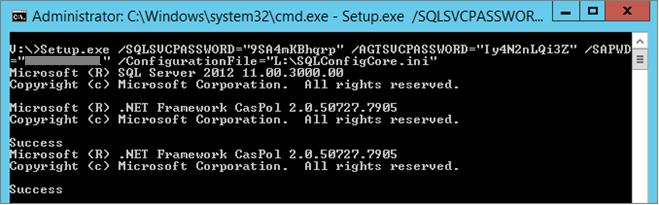
Setup command line
All configuration parameters are set in the INI file except the passwords for Security reason.
So to set password we have to use argument on the setup.exe.
We need to add to command line:
- * /SQLSVCPASSWORD=”xxxxxxxxx”
Specify the password for the SQL Database Engine service account
- * /AGTSVCPASSWORD=”xxxxxxxxx”
Specify the password for the SQL Server Agent service account
-
* /SAPWD=”xxxxxxxxx”
Specifies the password for the SQL Server sa account
For information, bellow the argument for manage services configuration (account, password, startup type):
| SQL Server component |
Account parameter |
Password parameter |
Startup type |
| SQL Server Agent | /AGTSVCACCOUNT | /AGTSVCPASSWORD | /AGTSVCSTARTUPTYPE |
| Analysis Services | /ASSVCACCOUNT | /ASSVCPASSWORD | /ASSVCSTARTUPTYPE |
| SQL Server Database Engine | /SQLSVCACCOUNT | /SQLSVCPASSWORD | /SQLSVCSTARTUPTYPE |
| Integration Services | /ISSVCACCOUNT | /ISSVCPASSWORD | /ISSVCSTARTUPTYPE |
| Reporting Services | /RSSVCACCOUNT | /RSSVCPASSWORD | /RSSVCSTARTUPTYPE |
| Full-Text Search | /FTSVCACCOUNT | /FTSVCPASSWORD | n/a |
Startup type values:
- Automatic
- Manual
- Disabled
For more information, see TechNet article “Install SQL Server 2012 from the Command Prompt“: https://msdn.microsoft.com/en-us/library/ms144259.aspx
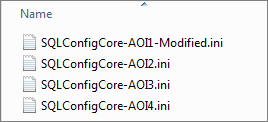
Prepare INI file for other nodes
Copy the INI file prepare before for each Server installation. Edit the file and replace the Instance name (with the other instance, in my case AOI2, AOI3 and AOI4):
| INSTANCENAME=”AOI1” INSTANCEID=”AOI1” FTSVCACCOUNT=”NT Service\MSSQLFDLauncher$AOI1” SQLBACKUPDIR=”G:\MSSQL\MSSQL11.AOI1\MSSQL\Backup” SQLTEMPDBDIR=”G:\MSSQL\MSSQL11.AOI1\MSSQL\TempDB\Data” SQLTEMPDBLOGDIR=”L:\MSSQL\MSSQL11.AOI1\MSSQL\TempDB\Log” |
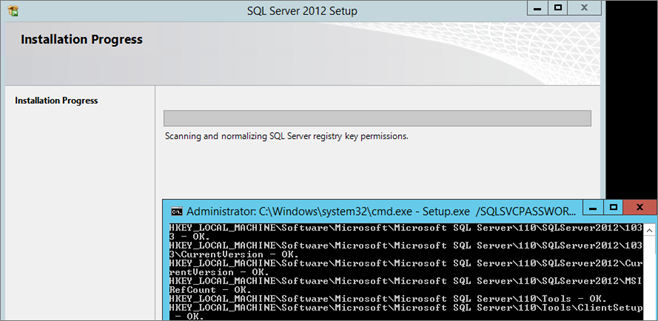
Install SQL Server on Core Nodes
Do this operation for all nodes (in this lab m-sqla2/ m-sqla3/ m-sqla4).
Connect to M-SQLA2 with sqlaoadm account
- * Copy the INI configuration file to L:
- * Check Volumes
- * Copy Cumulative Update in the location specify in the parameter: UpdateSource
- * Mount SQL Server ISO
- * Launch a CMD in as Administrator
Launch installation:
| Setup.exe /SQLSVCPASSWORD=“xx” /AGTSVCPASSWORD=“xx” /SAPWD=“xx” /ConfigurationFile=“L:\SQLConfigCore.ini” |
Configure Instances
Done the following configurations on all Instances:
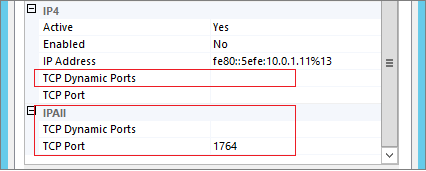
Configure – Instance TCP Port
TCP Dynamic Ports = 0, indicate that the Database Engine is listening on dynamic ports, on a named-instance TCP Dynamic Ports it’s enabled by default:
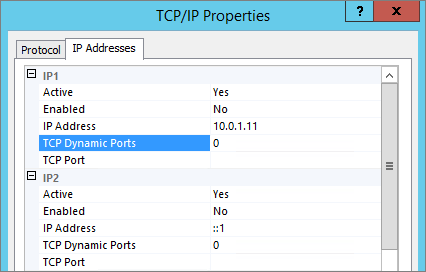
Configure Instance Static Port via Console (SQL Server Configuration Manager)
In “SQL Server Configuration Manager“, go to SQL Server Network Configuration\Protocols for <instance>\TCP/IP properties.
To set a Static Port:
- * Delete “TCP Dynamic Ports” value 0 for all IP (IP1, IP2, …)
- * On IPALL clean the “TCP Dynamic Ports” value
- * On IPALL enter you Static port in “TCP Port” Field
- * Restart SQL Server Service
Configure Instance Static Port via PowerShell
- * 1 – Execute the script “SQL_Get-Instance-Network-Cfg.ps1” to retrieve SQL Configuration:
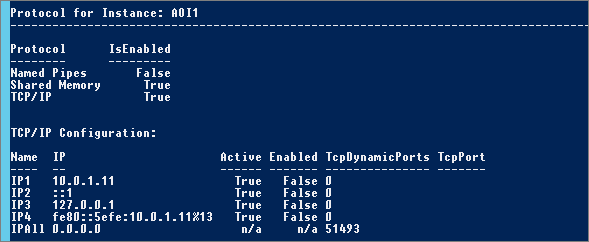
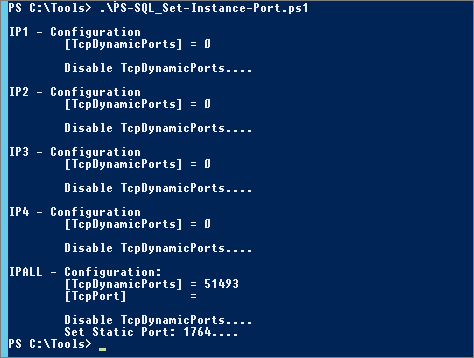
- * 2 – Edit the script “SQL_Set-Instance-Port.ps1” (set ServerName, Instance and Port) and execute it (with Administrator rights):
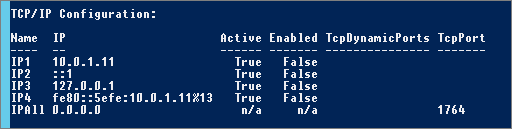
- * 3 – Check configuration (SQL_Get-Instance-Network-Cfg.ps1):
Restart SQL Instance service
Get-Service -Name ‘MSSQL$AOI1’ | Restart-Service
Check configuration from console:
Information/Note:
| NOTE | Check if Instance is listening on the defined port |
Use netstat: |
|
| NOTE | Retrieve TCP Configuration from Registry |
Go to : HKEY_LOCAL_MACHINE\SOFTWARE\Microsoft\Microsoft SQL Server\<InstanceName>\MSSQLServer\SuperSocketNetLib\Tcp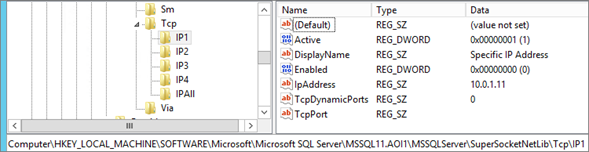 |
|
| NOTE | View Windows Dynamic Port range configuration |
netsh int ipv4 show dynamicport tcp So Range is: 49152 to 65535 So Range is: 49152 to 65535 |
|
Configure Instance Memory
The memory configuration depends of your environment (if SQL Server is mutualized, number of instance …). I will not cover this part in this article. But in this lab, Servers are dedicated to SQL and there is only one instance per servers, so I allow SQL to use memory dynamically (default option).
For more information about memory configuration see TechNet article “Server Memory Server Configuration Options“: https://technet.microsoft.com/fr-fr/library/ms178067.aspx
Configure TempDB
This article does not cover TempDB Tuning, but you can read note in “Part 2 – Lab Design“.
Get Number of Cores:
|
Transact-SQL |
|
| SELECT cpu_count FROM sys.dm_os_sys_info; | |

If you need to add additional TempDB files:
|
Transact-SQL |
|
| ALTER DATABASE [tempdb] ADD FILE (NAME = N’tempdev2′, FILENAME = N’G:\MSSQL\MSSQL11.AOI1\MSSQL\TempDB\Data\tempdb2.ndf’, SIZE = 10GB, FILEGROWTH = 10%) | |
Note: A recommendation is that all TempDB files must have the same size. So to do this you have to disable autogrowth for all files (during creation: FILEGROWTH = 0) and set the right size to all TempDB.
List Database Files:
|
Transact-SQL |
|
| SELECT MF.database_id AS [DB ID],SD.name AS [DB Name], MF.name AS [Logical Name], MF.physical_name AS [Physical Name], MF.type_desc as [Type], MF.state_desc AS [State], (MF.size*8)/1024 AS [Size MB],growthFROMsys.master_files MF, sys.sysdatabases SDwhere MF.database_id = SD.dbid AND SD.name = ‘tempdb’ | |

Another way to list Database Files:
|
Transact-SQL |
|
| USE TempDB GO EXEC sp_helpfile GO |
|

Instance – Enable AlwaysOn
Now we can enable the “AlwaysOn Availability Groups” feature on the instance.
Note: This option is only available if the server if member of a WSFC cluster.
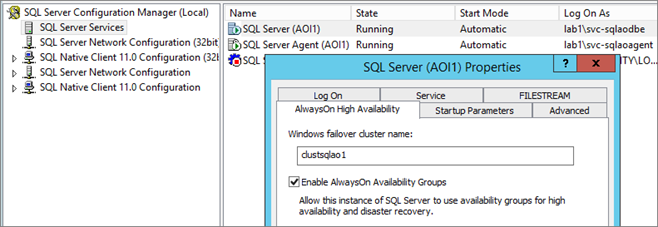
1 – Via Console
From “SQL Server Configuration Manager” console edit the “SQL Server (<instance>)” service properties. In the “AlwaysOn High Availability” tab, check the box “Enable AlwaysOn Availability Groups“.
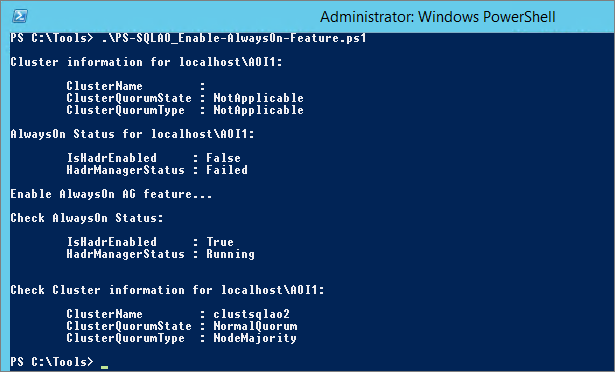
2 – Via PowerShell
PowerShell Command:
Enable-SqlAlwaysOn -ServerInstance “$SQLServer\$SQLInstance” -Force
(-force remove user confirmation; command automatically restart instance)
Use script SQLAO_Enable-AlwaysOn-Feature.ps1
| NOTE | Retrieve SQL Server Property with Transact-SQL | ||||||
AlwaysOn Availability Group Property:
SELECT SERVERPROPERTY (‘IsHadrEnabled’);
|
|||||||

Security
Rename – System Administrator (sa) account
For Security, rename “sa” account:
–Rename Account
ALTER LOGIN sa WITH NAME = [9wadm]
| NOTE | Retrieve “System Administrator” account name with SID (Transact-SQL) |
| — Retrieve “sa” account name with SID SELECT sid,name,dbname,sysadmin,loginname FROM sys.syslogins WHERE sid = 0x01  — Change “sa” password — Change “sa” passwordALTER LOGIN sa WITH PASSWORD = ‘password’ |
|
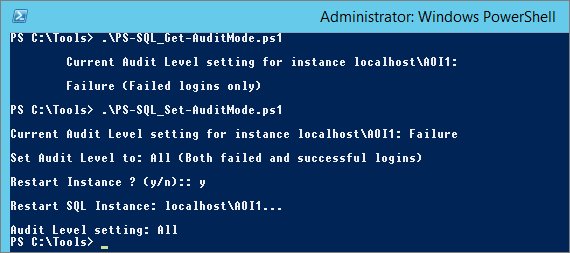
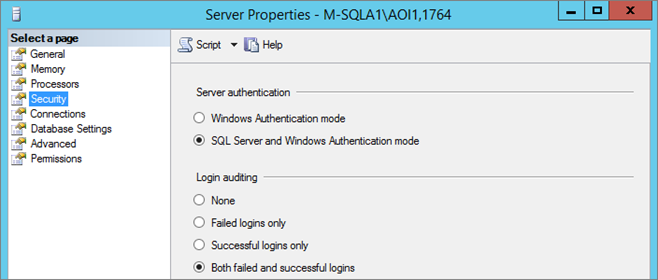
Configure – Login Audit
By default, audit is active for Failed “Logins only”, to monitor all connection set the audit to “Both failed and successful logins”:
I use two scripts:
Next
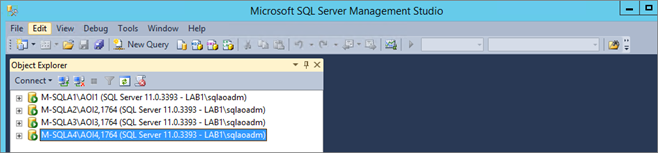
Connect on all instances from M-SQLA1.

Now the four instances are ready !
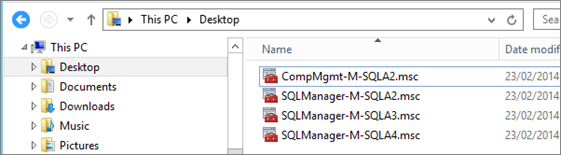
Create Remote SQL Configuration Manager MMC
From the management server (here m-sqla1) I create all “SQL Configuration Manager” consoles for all server (core or not) I have to managed.
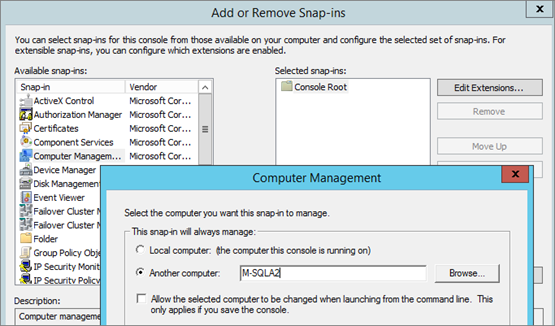
From M-SQLA1, launch mmc in Author mode:

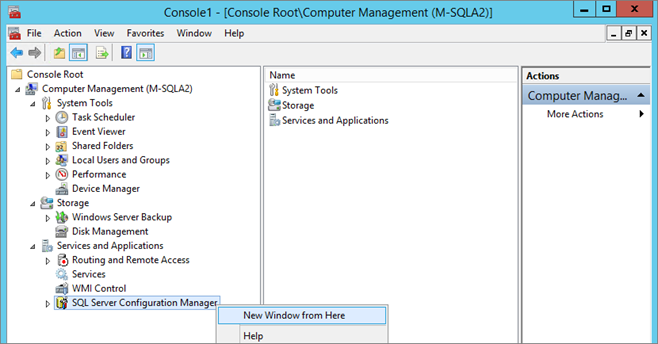
Add “Computer Management” and select a remote server:
Select “New Window from Here”:
Switch back to the “Computer Management” console (Window\1 Console Root) and close it:
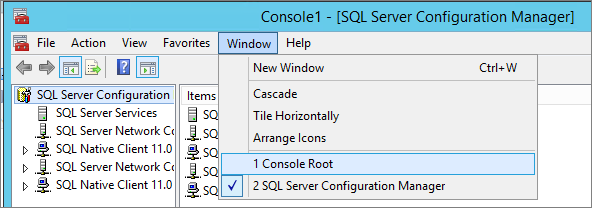
On the File menu, click Save As, and save the mmc. Close the MMC.
Next
Now the cluster and all SQL nodes are OK, the next part covers the creation of the first two Availability Group: AlwaysOn Availability Goup – Part 6 – Create first two AAG


From the snapshots above it’s unclear which option was selected to install SQL server. There are 3 options: 1) Standalone 2) New SQL server failover cluster 3) Add node to SQL failover cluster.
Found my answer and my setup is working. I used stand-alone installation Thanks