
If you read the news regularly, you probably have heard something about converged network. This is a model where the same network adapters are used to handle several kinds of traffics such as storage, live-migration, virtual machine networks and so on. This design brings flexibility, simplicity and is cost effective.
First of all, this design is flexible because you can add and remove networks easily. Let’s assume that you need to connect your virtual machines to a new network. To make the new configuration you just have to set the switch to add the right VLAN ID (VID) and reconfigure the VM with the right VID. It is easier than add a new network adapter and move the VM to a new virtual switch and this is why I said that network convergence brings simplicity.
Because you don’t need to buy a lot of network adapters, this design is also cost effective. With Windows Server 2016, we are able to converge almost everything, especially SMB traffics. So you can buy two network adapters faster than 10GB/s and converged all your traffics. Thanks to this design, you can have only three network cables plugged into each server (one for the Baseboard Management Controller and two for the networks). Can you imagine the simplicity of your cable management in your datacenter?
Converged Network overview
To understand the network convergence, it is important to apprehend some network technologies. To deploy this kind of design, you need to understand the difference between an Access mode and a Trunk mode.
When you plug a standard server (I mean not a hypervisor) to a switch, this server doesn’t need to manage several VLAN. This server belongs to a specific VLAN and I don’t want that it can communicate in another VLAN. From switch perspective, you have to configure the related switch port to Access mode with a single VID.

On the other hand, some hardware need to communicate in several VLAN. The first example is the link between two switches. The second example is the hypervisor. When you deploy a hypervisor, it must communicate with several networks such as heartbeat, live-migration, management, storage and so on. From switch perspective, you have to configure the related port in Trunk mode.

Network convergence is based on switch ports configured to trunk mode. Each switch port connected to the hypervisor is set to trunk mode and with the required VLAN. Then all the configuration is done from the operating system. So let’s assume you need 20 hypervisors with two 25GB/s Network Interface Controllers (NICs) each. All you need is two dedicated switches with 24 ports at least and configure all switch ports in trunk mode. Then you just have to plug the servers and to configure the operating systems.

From the operating system perspective, Windows Server 2016 brings Switch Embedded Teaming (SET) which enables to converge almost everything. Before Windows Server 2016, you had to create a teaming and then create the virtual switches bound to the teaming virtual NIC. Some features were not supported in the parent partition as RDMA, vRSS and so on. So it was difficult to converge every networks. Now with SET, the teaming is managed inside the virtual switch and more features are supported especially vRSS and RDMA.
Once the SET is created, you just have to create virtual NICs in order to the hypervisor can communicate with the required networks (such as storage, live-migration, management and so on).
Design of the example
To explain you with more details the converged network, I’ll make a deployment example. Please find below the required network configuration:
- Management network (VID 10) – Native VLAN (1x vNIC)
- Live-Migration network: (VID 11) – require RDMA (1x vNIC)
- Storage network (VID 12) – Require RDMA (2x vNIC)
- Heartbeat network (VID 13) – (1x vNIC)
- VM Network 1 (VID 100)
- VM Network 2 (VID 101)
The Storage and live-migrations NICs are used for SMB Direct traffics.
The server where I make the example has a Mellanox ConnectX-3 Pro network adapter with two controllers.
Deploy a converged network
Create the virtual switch
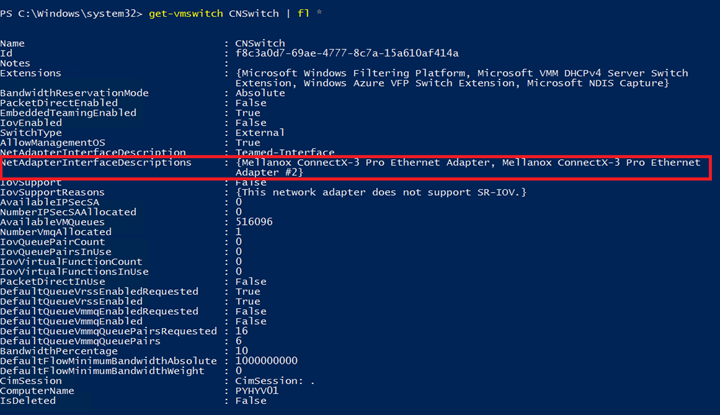
First of all, I run a Get-NetworkAdapter to get the network adapters that I want to add to the Switch Embedded Teaming:

Then I create a Switch Embedded Teaming with these both network adapters:
New-VMSwitch -Name CNSwitch -AllowManagementOS $True -NetAdapterName CNA01,CNA02 -EnableEmbeddedTeaming $True

Now I gather virtual switch information with Get-VMSwitch cmdlet to verify that my network adapters are bound to this vSwitch:
Create virtual NICs
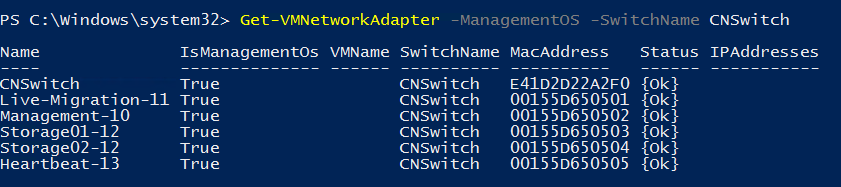
Next I create the virtual NICs for management, live-migration, storage and heartbeat. To create vNICs, I use the cmdlet add-VMNetworkAdapter with -ManagementOS parameter. If you don’t use -ManagementOS, you create a vNIC for a virtual machine.

I verify that my vNICs are created:
Now that we have created the vNICs, we have to associate them to the right VLAN ID. To make this configuration, I run the Set-VMNetworkAdapterVLAN cmdlet. I configure the vNIC in access mode in order to they tag packets:
$Nic = Get-VMNetworkAdapter -Name Live-Migration-11 -ManagementOS
Set-VMNetworkAdapterVlan -VMNetworkAdapter $Nic -Access -VlanId 11

$Nic = Get-VMNetworkAdapter -Name Storage01-12 -ManagementOS
Set-VMNetworkAdapterVlan -VMNetworkAdapter $Nic -Access -VlanId 12

$Nic = Get-VMNetworkAdapter -Name Storage02-12 -ManagementOS
Set-VMNetworkAdapterVlan -VMNetworkAdapter $Nic -Access -VlanId 12

$Nic = Get-VMNetworkAdapter -Name Heartbeat-13 -ManagementOS
Set-VMNetworkAdapterVlan -VMNetworkAdapter $Nic -Access -VlanId 13
The management vNIC requires a specific configuration because we want configure the native VLAN on this port. The native VLAN enables to send packets untagged and leave the switch make the tagging when the packet comes into the port. The switch tags the packet with the native VLAN ID. It is really useful especially for deploying your servers with PXE / DHCP. In order to vNIC leaves packet untagged, we have to use the special VID 0.
$Nic = Get-VMNetworkAdapter -Name Management-10 -ManagementOS
Set-VMNetworkAdapterVlan -VMNetworkAdapter $Nic -Access -VlanId 0

Enable RDMA
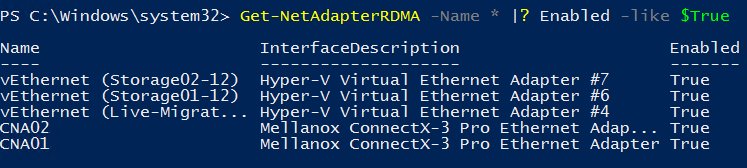
Now that vNICs are deployed, we can enable RDMA. We have seen that storage and live-migration requires this feature. To enable RDMA on vNICs Storage01-12, Storage02,12 and Live-Migration-11, you can run the following cmdlets:
Get-NetAdapterRDMA -Name *Storage* | Enable-NetAdapterRDMA
Get-NetAdapterRDMA -Name *Live-Migration* | Enable-NetAdapterRDMA
Then I verify if the feature is enabled:
Deal with QoS
Because storage and live-migration are converged with the other traffics, we need to give the priority over the others. If you are using a RoCE (RDMA over Converged Ethernet), you can run the following script (taken from Microsoft):
# Turn on DCB
Install-WindowsFeature Data-Center-Bridging

# Set a policy for SMB-Direct
New-NetQosPolicy "SMB" -NetDirectPortMatchCondition 445 -PriorityValue8021Action 3

# Turn on Flow Control for SMB
Enable-NetQosFlowControl -Priority 3

# Make sure flow control is off for other traffic
Disable-NetQosFlowControl -Priority 0,1,2,4,5,6,7

# Apply policy to the target adapters
Enable-NetAdapterQos -InterfaceAlias "CNA01"
Enable-NetAdapterQos -InterfaceAlias "CNA02"


# Give SMB Direct 50% of the bandwidth minimum
New-NetQosTrafficClass "SMB" -Priority 3 -BandwidthPercentage 50 -Algorithm ETS
Priority Flow Control (PFC), must also be configured in switches. With this script, the SMB traffic has 50% of the bandwidth at least and the other traffic will share the remaining 50%.
Set affinity between a vNIC and a physical NIC
In this example, I have deployed two vNICs dedicated for storage. Because these vNICs are bound to a SET, I am not sure that the storage traffic will be well spread across the two physical NICs. So I create an affinity rule between vNIC and physical NIC. While the physical NIC is online, the associated vNIC will use this specific physical NIC:
Set-VMNetworkAdapterTeamMapping –VMNetworkAdapterName Storage01-12 –ManagementOS –PhysicalNetAdapterName CNA01
Set-VMNetworkAdapterTeamMapping –VMNetworkAdapterName Storage02-12 –ManagementOS –PhysicalNetAdapterName CNA02
If CNA01 fails, the Storage01-12 vNICs will be bound to CNA02 physical NIC. When the CNA01 will be online again, the Storage01-12 vNIC will be reassociated to CNA01.
Configure the IP addresses
Now you can configure the IP Addresses for each vNICs:
New-NetIPAddress -InterfaceAlias "vEthernet (Management-10)" -IPAddress 10.10.0.5 -PrefixLength 24 -Type Unicast
Set-DnsClientServerAddress -InterfaceAlias "vEthernet (Management-10)" -ServerAddresses 10.10.0.20

New-NetIPAddress -InterfaceAlias "vEthernet (Live-Migration-11)" -IPAddress 10.10.11.5 -PrefixLength 24 -Type Unicast
New-NetIPAddress -InterfaceAlias "vEthernet (Storage01-12)" -IPAddress 10.10.12.5 -PrefixLength 24 -Type Unicast
New-NetIPAddress -InterfaceAlias "vEthernet (Storage02-12)" -IPAddress 10.10.12.6 -PrefixLength 24 -Type Unicast
New-NetIPAddress -InterfaceAlias "vEthernet (Heartbeat-13)" -IPAddress 10.10.13.5 -PrefixLength 24 -Type Unicast
The both storage adapter IP addresses belong to the same network. Since Windows Server 2016 we can add two SMB NICs to the same network. It is possible thanks to Simplified SMB MultiChannel feature.
Connect virtual machines
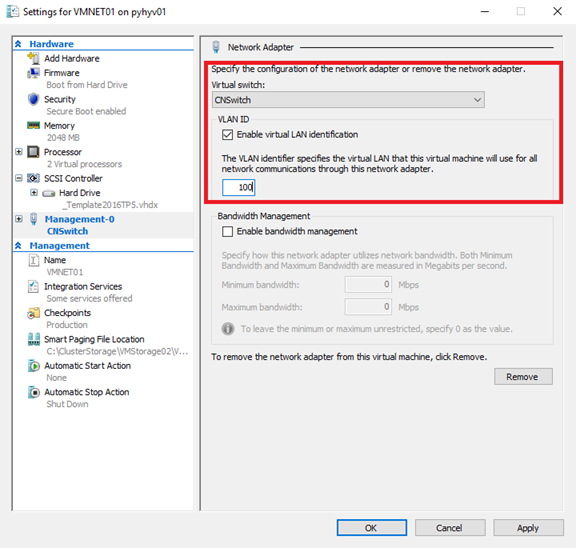
Now that your Hyper-V is configured, you can create a VM and connect it to the virtual switch. All you have to do is to configure the VID and the vSwitch.
Conclusion
With Windows Server 2016, the network convergence is easier to deploy than with Windows Server 2012R2. Network convergence brings you, flexibility, simplicity, a better cable management and quick deployment. Because you need less network adapters, this design reduces the cost of the solution. As we have seen with this example, the network convergence is easy to deploy and can be fully automated with PowerShell. If you have Virtual Machine Manager, you can also make this kind of configuration from the VMM console.


If I was to create your network example in VMM, building logical networks, I assume you’d use VLAN based networks and not 1 connected network?
Hi,
I always configure Fabric networks (as Live-Migration, Management, Backup, Storage and so on) as a one connected network. With this method, you can also specify a VLAN number. For tenant/client networks, I create VLAN-based networks in order that client can manage these networks from VMM.
Regards,
Romain
Thank you for this post it helped my understanding a great deal. I have one question the step
New-VMSwitch -Name CNSwitch -AllowManagementOS $True -NetAdapterName CNA01,CNA02 -EnableEmbeddedTeaming $True
creates a virtual nic are we supposed to assign an IP to this nic or disable it as we are assigning an IP to the Management vnic?
Hi,
When you specify -AllowManagementOS $True, a vNIC is created. You can assign the server IP to this IP and manage the machine accross the vNIC.
Regards,
Romain
Roman
I thought the Management-0 vNIC was for managing the server?
I guess the best thing to do is make sure the vswitch vnic and the management-0 vnic are on different subnets. In my case they are the same subnet
When you create a Switch Embedded Teaming there is no vSwitch by default. If you specify AllowManagement to $true, a vNIC is created and you can name it management-0 if you want.
Hi Romain, thank you for the article! I’ve tried the steps that you showed, however it looks like I’m missing something fundamental, and if you could point out the direction that would be really great.
So scenario, an L3 switch, vlans 10 (int vlan ip 10.0.10.1) 11 (int vlan ip 10.0.11.1) and vlan 12 (int vlan ip 10.0.12.1). Trunk port configured with native vlan 10 and connected to a hyper-v host NIC. External switch created and a VM server 2016 deployed with 2 NICs connected to the external switch. In the server VM I followed your steps, created SET switch (which also created a SET vNIC) + created 3 VM network adapters 10.0.10.5, 10.0.11.5 and 10.0.12.5. Now the only connection I can get if when I configure IP address on the SET vNIC that belongs to the same subnet as native VLAN on the trunk. So I can ping 10.0.10.5 from L3 switch vlan 10 vlan interface 10.0.10.1. it’s like the trunk is not working at all…L3 Switch can’t see any of the vNICs apart from SET vNIC and vise versa. Can you see a mistake I’m making?
Hi,
SET create a vNIC when you specify -ManagementOS $True. You can use it as the management vnic (vlan 10, 10.0.10.x). For other vNIC, have you specify the VLAN number in the OS with Set-VMNetworkAdapterVLAN -ManagementOS cmdlet ? Except for the management vNIC, you have to specify the VLAN for each vNICs in order to tag packet.
Regards,
Romain
Hi, Romain, yes, I have. I followed your article from the beginning till the end 🙂
It might be that my switch doesn’t support MTU size 1674, the maximum I can get is 1560. I can’t find any proper information about setting up physical networks that can handle the SET scenario… I’ve also tried the standard approach creating a team and creating subinterfaces with appropriate vlan with the same result.
One more thing, what gateway should I use for all of the vNICs created? Should it be a single gateway for all the vNICs (including SET vNIC), for example a dedicated standalone gateway server with routing role installed?
Great post thanks for the info.
In your diagram above – you have a cable between both the physical switches, are those ports configured in a particular way? I am trying to work out a similar design, 2 x small switches with 10GB ports that will have 1GB uplinks to a switch used by the client machines, and I’m a bit concerned about maybe creating a network loop.
thanks for any advice
Hi Dave,
This cable can be a stack cable to stack switches or it can be also an Ethernet cable. In case of Ethernet cable, you have to leverage Spanning Tree to avoid loops. This cable enables both switches to communicate without going up to another switch. You can also deploy a switch to interconnect these both switches. The network design is up to you, regarding your needs and money.
Regards,
Romain
Thanks for clearing that up. All a little bit new to me this networking lark!
Hi Romain Serre,
I’m researching if it would be feasible to setup a s2d hyper-converged cluster for my company. Everything seems feasible accept for the part that a DCB switch is needed for the entire setup. DCB switches will cost at least 7k and in order to avoid a single point of failure I need 2 of them. Investing 14k isn’t worth my investment of 22k in hardware for a 3 node cluster setup.
Have you come across a affordable DCB enabled switch or is there anyway to get around involving DCB enabled switches? I have read about Iwarp and was wondering if I should make use of that. I’m setting the environment up in a single rack and will start with 3 nodes. DCB seems to be highly enterprise and I just want a simple S2D with RDMA.
Looking forward to your response.
I think what i’m trying to say is, there may be no need for me to leverage a converged scenario when it comes to networking. I’d possible rather have physical switches for storage, LM and management for example, but will this eliminate the need for DCB.
Hi,
For S2D solution, RDMA is not mandatory but just recommended. So if you want to save money, you can work without RDMA (you will lose some performance without RDMA). If you choose RDMA, you can implement RoCE which requires DCB or iWarp which is more plug and play.
If you choose RDMA with RoCE you have to implement DCB.
Regards,
Romain
Hi Romain,
Thank you for your quick reply. I have read many posts where people setup a 2 node cluster and use RDMA directly between the nodes eliminating the need for a switch. Would it be possible to build a switch-less setup by daisy-chaining 3 to maximum 5 nodes again eliminating the need for a switch. The 10GBE controllers would be dedicated to the Live Migration Network and the Storage network both of which require RDMA.
Best regards,
Jasper
Hi,
I have deployed a two-node hyperconverged here with direct attached: //www.tech-coffee.net/2-node-hyperconverged-cluster-with-windows-server-2016/
However it is not supported to chain nodes. You have to buy a switch. If switches are too expensive, you can deploy a solution without RDMA.
Regards,
Romain
Hi Romain,
I was following your article, but after creating the SET-vSwitch the status ‘RDMA Capable’ of the rdma-nics went to ‘False’ . (Get-SMBClientNetworkInterface) Therfore RDMA did not work while the status of the vNics show ‘Enabled = True’ (Get-NetadapterRDMA). Did you have an idea what happen ?
Hi,
Have you run Enable-NetAdapterRDMA ? Then check in perfmon if RDMA is running.
Regards,
Romain
Thank you Romain. I can now see the difference between Vmware world where we assign VLAN on per port group and configure VNIC of the VM to port group. Here in Hyper-V we create a switch and assign VM vNIC to the switch plus configure VLAN on per VM basis.Am I right?
Hi Romain,
Great Article. Just to clarify,to connect VM’s to the external network, all we need to do is set up VMnetwork VLANs 100 and 101 on the switch, add the vlans 100 and 101 to allowed list on the trunk port that is connected to Hyper-V host and then under VM settings just select the VMSwitch and type VLAN 100 or 101? Am i correct?
Hi,
From the switch perspective, you configure the trunk mode on port with allowed list 100 and 101. From Hyper-V side, you set the VLAN ID in the vNIC of the VMs. You don’t need to create a Hyper-V vNIC for each VLAN.
Hi
I have a 4 node cluster environment with 4 NICS and have enabled RDMA on 3 of the hosts.
I enabled RDMA on one of the host and noticed that all my VMS went into paused state.
The moment I disabled RDMA ,machines were back to normal.
Hi,
Are you sure that RDMA is well set on each node and on switch side ? Which implementation do you deploy: iWARP or RoCE ?
Hi Romain,
I’ve found this article so interesting that I’ve decided to use the same configuration on a customer environment and it is working great!
However, I wanted to manage the so-created Hyper-V cluster with VMM 2016 and the Virtual Switch created with your procedure seems impossible to convert to a Logical Switch. Have you ever experienced the same situation? There’s any way to do that?
Thanks…
Hey,
Glad this topic helped you. For some customers, I have migrated standard switches to logical switches by using this script: https://docs.microsoft.com/en-us/system-center/vmm/network-switch?view=sc-vmm-1711#script-for-set-switch-conversion But it applies only to SET 🙂
Did you create vnics for your VM server networks too? I Dont see that in your powershell. Just trying to figure that part out. Any reason you see fit to have a backup vnic? So I can run all of my backups with veeam over a separate vlan?
Hey,
First, you don’t need to create vnic for VM networks. vNICs are virtual NIC for the hypervisor to be able to be reachable from those networks. Regarding the backup network, this is an example. If your software supports to seggregate the backup traffic, you can do it.
Hi Romain – I just read you last comment above and was wondering if you could expand. I come from a VMware background and would add a port group to a vSwitch and call it guest network. I would then choose this guest network when building the VM.
In the above I see you have VM Network 1 and 2, but didn’t see you create it on the switch. I guess I missing something… Help Please.
Thanks!
Hey,
It’s not like VMware, you don’t have to create “port group” for VM. In Hyper-V world, you just have to change the VLAN tagging in the vNIC configuration. I called them VM network 1 & 2 for example. But in system configuration, these names don’t exist.
Hey Romain,
I have 1 adapter with two 10gb fiber ports and another with 4 1gb ports. Any good way to utilize both adapters? Or do I really need another 2 port 10gb adapter? Thanks!
Hey,
It depends on the storage behind. If you have connected your storage through SAS or dedicated port, you can use only both 10Gb/s 🙂
Just wanted to share an article that will help improve on your efforts here. There is no such thing as a heartbeat network, it occurs dynamically without a dedicated network.
https://techcommunity.microsoft.com/t5/Failover-Clustering/No-such-thing-as-a-Heartbeat-Network/ba-p/388121