
Microsoft recently announced a new feature called Storage Spaces Direct that enables to make a storage solution in High Availability with local storage of each node. This local storage can be internal disks or external disks in a JBOD tray for example. This technology supports SATA or SAS disks. It is a great improvement for Software-Defined Storage (SDS).
Software-Defined Storage Microsoft implementation
The Microsoft journey about Software-Defined Storage began with Windows Server 2012 which has introduced Storage Spaces, Storage Pools and Scale-Out File Servers. The storage pools enable to aggregate physical disks to create some virtual disks. These virtual disks are called Storage Spaces. In a High Availability model, storage spaces can be integrated with Failover Clustering to create Cluster Shared Volumes (CSV) for Scale-Out File Servers.
The Scale-Out File Server enables to create File Shares (based on SMB 3.02 on Windows Server 2012R2 and SMB 3.11 on Windows Server 2016) that are online on each node of the cluster. This feature is only useful for application data as Virtual Machines.

Scale-Out File Server with Shared SAS JBOD
To implement this kind of solution, you need several shared SAS JBOD enclosure connected to each File Server node. So a SAS fabric is required (SAS switches and SAS cables). Then File Servers are in the same cluster to host Scale-Out File Server. To finish, Hyper-V and File Servers are usually connected by using dedicated RDMA NICs (SMB Direct). In this solution, only SAS disks are supported (SATA is unsupported because it doesn’t support Multi-Initiator).

Storage Spaces Direct
In Windows Server 2016 Technical Preview, Storage Spaces Direct has been introduced. This solution enables to create Storage Spaces in HA by using local storage. This local storage can be SATA, SAS or NVMe disks. These disks can be connected internally or externally by using a SAS JBOD enclosure. Compared to the Scale-Out File Serves with Shared SAS JBOD enclosure, the SAS Fabric is completely eliminated. Moreover, SATA disks are supported.
Hyper-V hosts and File Servers are connected as before by using RDMA NICs (SMB Direct). Moreover, in Windows Server 2016 the RDMA NICs can be converged. To be supported, this solution must be implemented on at least four nodes.

Deploy Software-Defined Storage solution based on Storage Spaces Direct
Requirements
- A cluster with at least four nodes installed on Windows Server 2016 Technical Preview 2. My cluster name is cluster-s2d.home.net. In this guide, each node is a NanoServer. To create VHDX easily, I recommend you to use this script.
- Because I use NanoServer, I need also another Windows Server 2016 Technical Preview 2 server to install RSAT.
- Each NanoServer node needs local storage. For a POC, you can create virtual machines with several VHDX attached.
- Each server must be member of an Active Directory.
Create the Cluster
To create the cluster, I’m connecting to the Windows Server 2016 with graphical interface and I run the New-Cluster cmdlet:

In the above screenshot, there is a warning. It is because I have not configured a witness disk for the Quorum. For this POC, I don’t need it. But in production I recommend you to implement the witness disk in another room of the cluster nodes.
Deployment
Once the cluster is deployed, the Storage Spaces direct can be enabled by running this command:
(Get-Cluster Cluster-S2D).DASModeEnabled=1

Next I open the Failover Clustering console to create the storage pool. In the documentation the Storage Pool creation is executed from PowerShell cmdlet. With NanoServer these cmdlets has not worked on my lab. So I have used the GUI to create Storage Pool. For more information about the options of this command, I recommend you to read this topic.
Now if you open the Failover Cluster Manager and you navigate to Nodes, you should see each node.

Then navigate to Storage and Enclosures. In this view, you should see each node with its local storage:

Next, right click on Pools and select New Storage Pool. Select the cluster and give a name to your Storage Pool.

Then select the disk that will be allocated to the Storage Pool and click on next.

After the creation of the Storage Pool, you should see it in Pools view. I rename it VMSTO.

Now the Storage Spaces can be created. So right click on your Storage Pool and select New Virtual Disk. Then I select VMSTO pool.

Give a name to the virtual disk and click on next.

Next select the resilience level and click on next.

Once the Virtual Disk is created, you have to create a volume and assign it to the cluster. When the volume will be added to the cluster, it will be shown as Available Storage.
Select the cluster and the Virtual Disk and click on next.

Then you can assign a drive letter to the volume. I prefer to not assign a driver letter or a folder because the volume will be converted to Cluster Shared Volume.

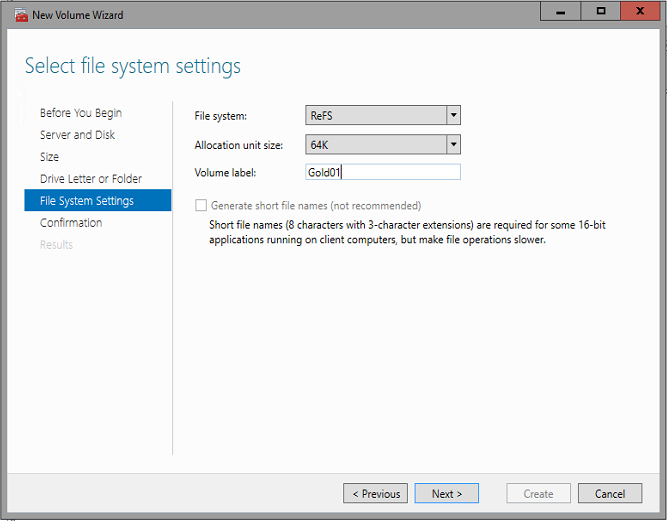
Specify a File System, an allocation unit size and a volume label. I recommend you to use ReFS because there are some benefits in Windows Server 2016 especially for the Virtual Machines datastore. ReFS provides accelerations for VHD(X) operations (fixed creation, dynamic growth and merge).
Once the volume is created, it is available for storage. So right click on the Cluster Virtual Disk and select Add to Cluster Shared Volumes.
To finish run the following command to disable the ReFS integrity streams by default on the volume:
Set-FileIntegrity c:\ClusterStorage\VolumeX –Enable $False
Create shares
Now we have to add the Scale-Out File Server role. So add a file server role and choose SOFS. Because I use NanoServer, I have to install first the File and iSCSI Services. So on the Windows Server 2016 with GUI, I open the Server Manager and I add my four NanoServer. Then I select Add roles and features wizard and I select NanoServer to install feature remotely. I install the File and iSCSI Services on each NanoServer.

Then I can come back to my cluster and add a File Server role. Because I want to store VMs on shares, I select Scale-Out File Server for application data.

Next specify a name for this role. Once the role is added, right click on it and select Add File Share.

Next select SMB Share – Applications.

Then give a name to the share and click on next.

Next you can enable some features. I prefer to leave default settings and click on next.

Next I add permission for my Hyper-V hosts and Virtual Machine Manager.

Once the share is created, you should see it in the shares tab of the SOFS role.

At this moment, you can store Virtual Machines on the share. It’s really cool no ? J
Optimize Storage Pool
During the life cycle of the storage solution, disks can be added or removed from the storage pool. Data on storage spaces are also added, edited, removed and so on. So some disks will be empty while others will be full. In order to the storage capacity can be used equally and so optimize performance, you can run the following command:
Optimize-StoragePool $MyStoragePool


Excellent post! But I am wondering something.
If I setup a 2-node S2D cluster on which I also want to host a hyper-v cluster, is it possible to dedicate the storage network to a particular subnet? For example, with iSCSI and MPIO you can dedicate your storage traffic to particular network cards / subnet. With S2D in my test environment, my cluster is using any network (management/migration/storage subnets) for storage traffic. I want to circumvent this because obviously my storage network cards are higher speed (eg 10G) and my other network cards are slower (1G). I want to tell the cluster to only use certain NICs for S2D storage traffic.
A better example is VMware vSAN. In vSAN I can dedicate network cards for vSAN traffic. I want to do the same thing with S2D.
Is this possbile?
Hi,
You can’t choose explicitly the storage network. However, if you have RDMA NICs, the storage traffics will use these network adapters in priority. You can also play with Cluster network metric. More the metric is low, more the storage and cluster flow will use the related cluster network. I recommend you also to deploy a cluster with only one cluster network for management (cluster and client) and one (if Simplified SMB Multichannel) or two cluster networks for Live-Migration, Storage and so on. Live-Migration and S2D use the same protocol (SMB 3.11) and it is complicated to implement QoS and differentiate these traffics.
Regards,
Romain
Hi Romain,
Thanks for the explanation. So S2D works a bit different than a regular cluster.
If I would have nodes with 3 NICs: 2x 10G and 1x 1G for example. Can I create a hyperv virtualswitch on the 1G card, share the card with the host for management and use the other 2 10G NICs for S2D and Migration? Would that work? I really want to prevent storage traffic from flowing over slow NICs.
I do not have RDMA NICs.
Thanks!
Hi,
Yes you can do this: //www.tech-coffee.net/2-node-hyperconverged-cluster-with-windows-server-2016/. Just set a low cluster network metrics on storage and live-migration network and the storage traffic will pass through these cluster networks.
Regards,
Romain
Thank you. That was exactly what I was looking for. I am stuck with non-RDMA NICs so have to manually prioritize my networks.
Thanks for your guide Romain, one thing though, I am configuring this set up with a separate storage cluster and when I create the VMs I am pointing the config to the clustered shared volume and it keeps failing saying access denied.
I have set domain users full access to the share, but I read that you cannot point a vm config to a UNC path, any ideas?
Thanks
Nevermind sorted it.
Theres an issue in 2016 within WinRM.
https://blogs.technet.microsoft.com/askcore/2017/05/17/hyper-v-authentication-in-windows-server-2016-for-managing-remote-hyper-v-servers-through-rsat/
You have to use constrained delegation so everything now works 🙂